Through Lorengau to Rossum
In view of the estimated number of Japanese on Manus, enemy resistance to the 2d Brigade's attack had seemed insignificant. Lugos Mission and its beaches were left practically undefended, and the positions along Number One and Number Three Roads, which -night easily have been reinforced, were lightly held. Although Japanese in bunkers at the airdrome had carried on successful delaying actions, some of the positions were not even manned.
However, there was reason to believe that Lorengau might be the spot chosen for a determined stand. On the body of a dead Japanese officer killed in the fight for the airdrome, maps were discovered showing the location of all defensive installations on Manus. These maps indicated that the enemy defenses were more extensive than previously estimated. Not only Lorengau but the road leading inland to Rossum was heavily fortified. If a substantial number of Japanese chose to fight it out in this area, they would have good positions for defense.
Lorengau: An Easy Conquest
Well-defended Lorengau is sheltered in a valley surrounded by jungle-covered hills rising to 400 feet. The Japanese had evidently considered that attack would come from the sea, for many of their defenses were sited to cover the shoreline. The offshore approaches and the three roads entering the settlement from the east, south, and north were also covered by defensive positions. From the position held by the 2d Brigade, the only approach to the town was over a sand bar at the mouth of the Lorengau River, a slow-moving stream
97
20 yards wide and 10 to 20 feet deep, except at the sand bar. The beach area, which our troops would then have to cross, was heavily protected. Naval demolition mines, containing 20 pounds of black powder and detonated by a master switch located in a control bunker up the hillside, covered the beach. About 100 yards inland from the beach a series of rifle pits and gun emplacements were constructed on the side of a dike which paralleled the shore. On the hills surrounding the harbor, beach, and town about a dozen heavy bunkers were used to reinforce the fires of beach defenses and to add depth to the position. As usual these bunkers were carefully camouflaged, although the concentration of naval and artillery fire as well as repeated bombings had disclosed the location of several.
Favoring the attacker, however, was the observation over the whole area afforded by the position of the 2d Squadron, 8th Cavalry on the ridge northwest of the town. A certain amount of cover was furnished by the rolling ground, and there were many excellent mortar sites from which both the mortar platoons of Troop H and the Regimental Weapons Troop could furnish close support. The range to the furthermost enemy position did not exceed 1,800 yards.
98
On the morning of 18 March the 2d Squadron, 8th Cavalry would move down from its ridge positions to the mouth of the broad river, cross over the sand bar, and attack Lorengau under cover of mortar and artillery fire. The Regimental Reconnaissance Platoon was to lead out, followed by the 2d Squadron and the Headquarters Troop marching in column of troops. At noon Navy minesweepers would come in to remove obstacles in Lorengau. Harbor, so that supplies could be quickly brought over water to back up the attack. The 7th Cavalry, which would not take part in the attack, was given the responsibility of covering the naval operations by neutralizing any fire received from the high ground south of Blue Beach.
Preceding the attack on 18 March and continuing through the initial phases, artillery and 81-mm mortar fires were directed at the whole enemy position. Since no personnel were visible, the automatic weapons did not join in the preparation except for harassing fire on the slits of those bunkers which could be seen. At 1000 the attack began. The Reconnaissance Platoon led out in single file through the heavy grass and crossed the sand bar in the river mouth to the opposite shore, followed by Troops E, F, and G. This maneuver
99
appeared to present a perfect target for the enemy, yet due either to dead spaces or the enemy's disinclination to disclose the positions of his guns until the attackers were within the shortest range, the advance progressed almost without interruption. Scattering fire from several light machine guns was the only enemy resistance. The Reconnaissance Platoon's mission was to clear the rifle pits, which had been badly battered by the initial fire preparation. After neutralizing the pits the platoon was to take a position astride the track leading into the settlement from the east. Advancing in a vigorous assault along the beach, the platoon drove the defenders off the beach positions and killed those who vainly attempted to stay the advance by remaining at their guns. In clearing the lower beaches, the platoon discovered and cut off the master cable connecting the beach mines with their detonator. Later on, a single Japanese, dead from concussion, was discovered in a small bunker overlooking the town, his hand still clutching the exploder.
While the Reconnaissance Platoon was clearing the shore area, the 2d Squadron troops made their way across the river. Occasionally a man would be hit and sink under the waist-deep water to be hauled ashore by his comrades, but the crossing continued in good order. Upon reaching the eastern shore the troops deployed and reorganized to continue the advance. Troop E was ordered to drive a wedge into the enemy center, while Troop F came up on its flank echeloned to the left rear. As Troop G gained the enemy bank, it directed its attack against the high ground on the right.
Once more the supporting weapons facilitated the advance, and as the troops drew near the safety limits of the artillery and heavy mortars, their automatic weapons and 60-mm mortars took up the fire. With complete confidence in their comrades manning the guns and mortars, little groups led by officers and noncoms assaulted bunker after bunker. Scarcely waiting for the mortar smoke to clear, the troopers were on the position with grenades and tommy guns before the bewildered occupants could man their guns. The entire defenses of the town were swiftly overrun and 87 of the entrenched enemy were killed. Comparison of the casualties marks the effectiveness of the 2d Squadron's attack, in which not one man was killed and only seven soldiers were wounded.
The weakness of the enemy resistance at Lorengau indicated that the earlier estimates of the Japanese strength on Manus were
100
too high. Instead of a garrison of over 2,000, it now appeared that not more than 500 troops remained to offer resistance to the 2d Brigade.
In the afternoon the entire 8th Cavalry Regiment occupied the Lorengau area, while Troop E was sent out to secure the road to Rossum. Patrols were also sent east to Salesia Plantation. While one squad advanced along the Salesia road, which followed the shore line, it was paralleled by another squad in a buffalo. The fire support furnished by the vehicle probably caused the Japanese to vacate a series of seven bunkers and leave behind an antitank rifle in perfect operating condition as well as a 20-mm machine gun. These bunkers were destroyed by captured naval mines used for demolition charges.
The 7th Cavalry remained on the ridge overlooking Lorengau, where they had established a perimeter the previous night. Supplies soon started arriving from Lugos Mission, as the engineers had been at work clearing the Number Three Road for several days. Given a rush order to complete the road on the afternoon of the 17th, three D-7's worked all night to clear the road and demolish pillboxes. Although the road was ready for traffic by 1100 on the 18th, it was
[101]
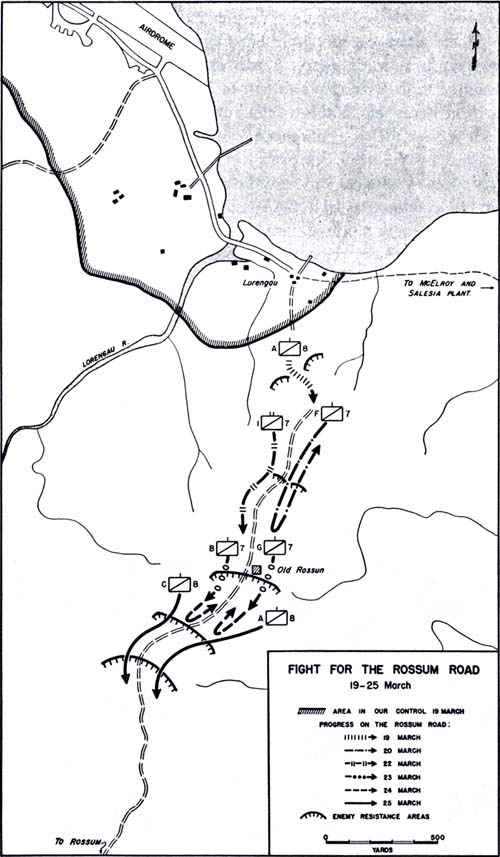
MAP NO. 13 Fight for the Rossum Road, 19-25 March
102
necessary to station bulldozers at points which frequently became impassable after heavy traffic. The engineers removed great quantities of mines encountered in the eastern drome area and in the road south of the drome to the river. The bangalore type did not prove highly effective; a tank which hit one suffered only a damaged tread. Anti-invasion mines on the Lorengau beach were all removed by the afternoon of 18 March.
Locating the Enemy Strength
Since the easy conquest of Lorengau, the estimate of enemy strength had been considerably scaled down. The next task was to determine how the remaining troops were disposed. According to the captured maps, strong positions guarded the road to Rossum, so it was thought that most of the Japanese force would be found there. To test the situation, patrols were sent out on 19 March along Number Two Road as well as on the other roads remaining in enemy hands. Troop B of the 8th Cavalry was directed to reconnoiter along the coastal track as far as McElroy Plantation; a patrol from Troop A was sent along Number Two Road which led through Old Rossum to Rossum (Map No. 13, opposite). Patrols from both regiments were sent inland along Number One Road.
The patrols along Number One Road made no contact with the enemy; one went as far inland as the trail junction just north of Tingo. Troop B also had good luck on its mission. Except for scattered sniper fire, the troop met no opposition as it moved into the McElroy Plantation accompanied by light and medium tanks. Facing inland, the troop dug in along the track at its entry to McElroy Plantation and spent an uneventful night. The Rossum patrol was riot so fortunate.
When 1st Lt. James M. Concannon was shown the enemy map of the area his patrol was to reconnoiter, he exclaimed, "Well, here goes Concannon to get himself a Purple Heart!" Lt. Concannon's platoon was ordered to go along Number Two Road which went to Rossum and from there to Kelaua Harbor, through the heart of the Japanese defenses indicated on the captured map.
Hardly had the platoon crossed the outpost line still held by Troop E along Number Two Road when it came under fire from a pair of bunkers sited to cover the track. Lieutenant Concannon and
103
one of his men were wounded. The platoon sergeant assumed command and attempted to flank the position. When the attempt was not successful, the sergeant decided to withdraw and report, as his mission was one of reconnaissance. Upon receiving the information that the enemy was in position not 200 yards from the outpost line, Colonel Bradley directed Major Shore to send Troop A back up the track to neutralize the enemy position. The troop was reinforced with machine guns and two 37-mm antitank guns.
The leading elements of Troop A encountered sniper fire as soon as they passed the outpost line. Machine-gun and small-arms fire was sprayed on the tree-top area and artillery fire was adjusted on it. Five Japanese were killed. The troop resumed its approach march until it reached the bend in the track where the enemy bunkers had stopped Lieutenant Concannon's platoon. Three or four machine guns in bunkers, and riflemen in trees and fox holes, proved an effective barrier to the troop's advance. Captain Jennings called for his 60-mm mortars to go into action, under cover of machine-gun fire. Antitank guns were also laboriously dragged by hand up toward the position. In overcoming the position, the action of the machine gunners was outstanding.
At the first fire from the bunkers, Cpls. Peter J. Armstrong and Armando V. Valencia set their heavy machine gun in position at a range of 30 yards from one of the bunkers. Having disclosed his position by laying a continuous burst of fire on the bunker, Corporal Armstrong was wounded by sniper fire. Armstrong continued firing until a grenade knocked him unconscious. Although the gun had been hit in several places and was leaking a steady stream from its water jacket, Corporal Valencia took over and continued firing at the bunker slits until the machine gun froze; then he fired with his submachine gun until it was knocked out of his hands by an enemy bullet. In the meantime the mortars had obtained four direct hits on the bunkers, and the antitank guns had made two. Corporals Armstrong and Valencia were later awarded the Distinguished Service Cross, and for its action during the day Troop A was given a unit citation.
After neutralizing the stubborn position, Troop A moved along the road slowly. The day was clear and hot 86.6° F. with humidity 82 and there were many cases of heat prostration. Enemy snipers continued to harass the troopers, and at a point about 500 yards
104
beyond the outpost line Troop A halted. Troop C came up to relieve the weary men, who returned to Lorengau.
Shortly after Troop C had begun organizing the position, a counterattack was launched by eight Japanese using rifle grenades and small arms. Considering the size of the attacking force, the casualties of the troop were heavy: 2 killed and 10 wounded. All the Japanese were killed, largely due to a quick adjustment by the forward observer of the 61st Field Artillery Battalion followed by four volleys fired for effect.
Despite the fact that dusk was approaching when the counterattack was broken, it was decided to attempt an evacuation of the wounded. Violating the iron-bound rule of not moving after dark taught an old, bitter lesson. The litter squads were fired on in the dark and four of the bearers were killed, six wounded. During the night Troop C was continually harassed by sniper and machine-gun fire, although no attacks were made on its positions. The artillery had adjusted a tight box barrage around the perimeter, but it was not found necessary to call for artillery during the night.
The day's action had confirmed the captured map's description of the Japanese disposition and defenses. It was clear that whatever enemy strength was left on Manus was concentrated down the Rossum Road. However, extensive areas to the east had to be cleared in order to prepare for the eventual linking with the 1st Brigade, as intelligence summaries had reported that the Japanese formerly opposing the 1st Brigade on Los Negros were withdrawing across Loniu Passage to Manus. Accordingly, it was decided at a conference on the evening of the 19th that the 8th Cavalry would have the mission of clearing the eastern end of Manus while the 7th Cavalry would get the tough Rossum Road assignment, as well as the western area. This would give the 8th Cavalry a comparative rest after its strenuous action since the Lugos Mission landing.
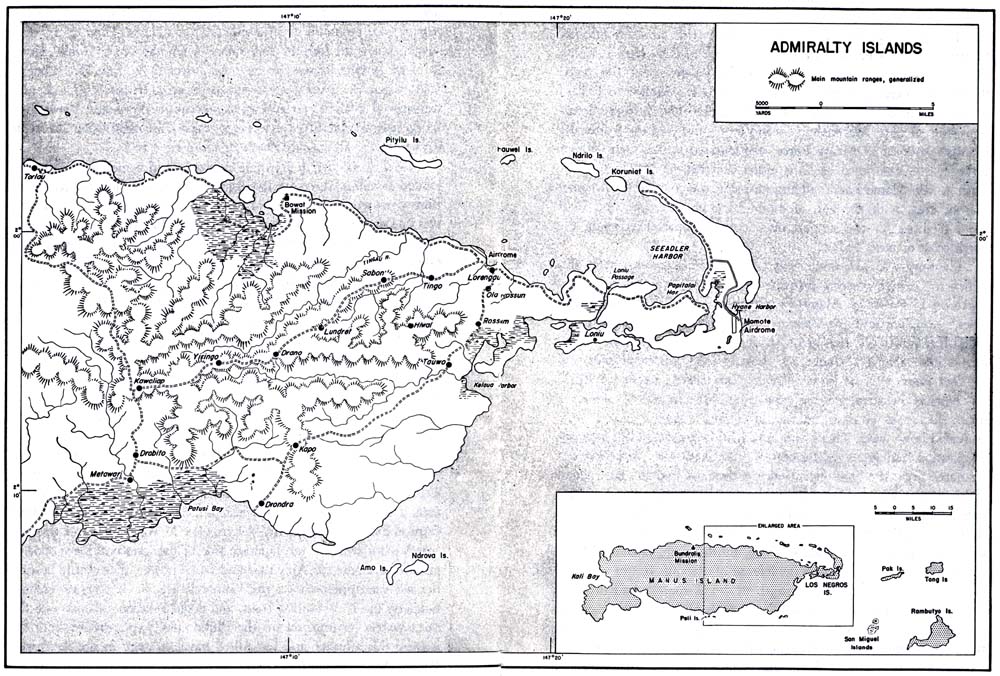
Patrols to western Manus were to set out on 20 March. A reinforced platoon from Troop B, on an LCM, was to reconnoiter the northern coastline as far as Bundralis Mission (Map No. 3, pages 8-9). Number One Road as far as Drano was the area assigned to Troop A for a 4-day reconnaissance. Both patrols heading west, inland and along the coast, were successful. Troop F, however, the first 7th Cavalry unit to have a try at the Rossum Road, ran into difficulties which were not altogether unexpected.
105
Heavy Going to Rossum
Number Two Road, situated along a spur of the island's main east-west ridge, is an easy route to defend. The track is a narrow corridor, flanked on both sides by precipitous banks which descend into deep, jungle-covered ravines. The first unsuccessful attempts to progress along the track indicated that the enemy fully recognized the defensive advantages of the terrain. Snipers found cover everywhere and well-constructed pillboxes, camouflaged and placed on commanding ground, contained automatic weapons carefully sited to deny the road to the attackers. Therefore, the problem of going through this territory would always present two difficult alternatives. Flanking the road through the jungle would be long, arduous, and strength-sapping, while a frontal attack would be costly because of the small number of troops that could be brought along the road to bear on the enemy positions. Troop F's mission for 20 March was to move along the road south to the Rossum-Tauwo-Kelaua Harbor area, reconnoiter for supply dumps and enemy positions, and return in three or four days.
In the morning Troop F, with one light tank and one bulldozer, passed through the positions of Troop C, 8th Cavalry, which was ordered to secure the rear of Troop F's advance. Small patrols of the advancing party, operating to the front and flanks, uncovered numerous shacks and supply dumps. At 1152 the patrol met enemy pillboxes at a position about 800 yards down the road, where two troopers were wounded.
From this point on, the advance was difficult. At 1250 Troop F reached the north edge of Old Rossum where it encountered strong resistance from mortars and machine guns in bunkers, situated both to the left of the road and in front. The position looked so strong that Capt. William C. Frey, the troop commander, asked the regimental headquarters whether he should attempt to push through. He was told to use the light tank and knock out the opposition. The troop destroyed two bunkers, but the enemy resistance showed no signs of weakening. Patrols sent to the flanks ascertained that approximately 150 Japanese, in the strong position extending across the road, blocked Troop F's advance.
At about 1600 Captain Frey told the regimental commander, "It's too hot for me here," and asked for permission to return
106
to Lorengau. Captain Frey and 10 other men were wounded and 5 had been killed. Under the protection of Troop E, sent forward along the road, Troop F withdrew to Lorengau.
Withdrawal of the vehicles along the narrow track surrounded by jungle was extremely difficult; they included, in addition to the
[107]
tank and D-7 dozer, a TD-9 (International tractor) towing a 1-ton trailer used for hauling supplies, and a radio jeep for communication. Before the tank could turn around, it had to back up several hundred yards. In retracing their route, both the tank and TD-9 hit mines, which blew tracks on each. Either the Japanese had come in behind the troops and mined the road, or the vehicles had failed to pass over the mines the first time and had followed a different track on their return. Under enemy fire, the dozer operators hooked on to the tank and towed it back to Lorengau. The other vehicles were abandoned after the jeep's radio was removed.
When Troop F had drawn inside the defense perimeter around Lorengau for the night, Troop G of the 8th Cavalry was placed astride the Rossum Road about 800 yards north of Old Rossum to hold the territory already gained in this direction. During the night artillery placed harassing fire on the Japanese positions in front of Old Rossum which had forced Troop F to withdraw.
It was now apparent that more extensive preparations and plans were required to carry on successful operations against the enemy blocking the road at Old Rossum. First, several patrols would move out to look for trails that could be used to flank the enemy holding the road. Other patrols would fan out to locate further enemy positions and prepare for future moves inland. After these preliminaries, which would take place on 21 March, an entire squadron, guided by natives from Angau, would attack the stubborn enemy positions in the area of Old Rossum.
In the morning of 21 March, Troop E took over the perimeter held by Troop G, 8th Cavalry and immediately pushed patrols out 600 yards toward Old Rossum. Patrolling throughout the day gained little new information. Some supply dumps were located, but there were no Japanese anywhere except along the Rossum Road. No trails for flanking the road positions could be discovered. The area north of Old Rossum was bombed by a scheduled strike of P-40's at 1800, after the patrols were all out of the area. Smoke shells fired from mortars and adjusted by an artillery observation plane guided the planes to the target, obscured in the jungle.
At 0820 on the clear morning of 22 March the 1st Squadron (less Troop A) moved down the Rossum Road. An artillery and mortar barrage preceded the attack, and a rocket concentration was fired on the enemy's rear area. A medium tank accompanied the
108
squadron to clear the way for the troops, but after the D-7 dozer accompanying it had a track damaged by a mine, the progress of the tank was slow and cautious, since it had to be preceded by a mine-detector squad. To give this squad protection, the tank had to stop often and spray the trees and area in front with machine-gun fire.
At 0905, the squadron called for mortar fire to aid the tank in clearing out snipers and grenade-throwers encountered about 400 yards north of Old Rossum. Troop C was withdrawn slightly to permit a concentration of 75-mm shells from the howitzers at Butjo Luo to be placed on three bunkers holding up the advance. Bazookas were brought forward to fire against bunker ports. After overcoming this position, Troop C again met determined resistance only 50 yards further on from snipers, grenade-throwers, and machine guns. It was sent out to try to work around this position from the east, while Troop B was brought forward on the road. The second center of enemy resistance was impossible for Troop B to overcome without support, so all troops withdrew to allow both artillery battalions to concentrate on that point.
With adjustments made by air observation, the 99th and 61st Field Artillery Battalions fired time fuze to silence snipers, and delayed fuze to penetrate bunkers. Troops C and B advanced abreast, this time receiving no return fire. They destroyed five pillboxes and by 1850 reached the northern edge of Old Rossum, where they formed a perimeter for the night. In an advance of only a few hundred yards, the squadron had suffered a loss of 11 killed and 29 wounded, and had not yet wiped out enemy resistance along Number Two Road.
Having spent a comparatively quiet night, harassed only by a few snipers, the 1st Squadron set out at 0730 to again try to destroy the enemy blocking the way to Old Rossum. This time two troops advanced along the ridges on each side of the road to avoid another costly frontal attack along the route covered by the enemy's automatic weapons. Troop B moved forward on the right and Troop G on the left. Troop C remained in reserve. A light tank with its accompanying bulldozer moved along the road.
During the night the enemy had evidently put more mines in the road. Before moving along very far, the bulldozer hit a mine which blew a track. The enemy had also effectively blocked the road by setting fire to the TD-9 and trailer abandoned by our forces on 19 March. The armored attack bogged down and the cavalrymen made
109
little progress. At 1150 artillery and mortar concentrations were placed on the enemy positions at Old Rossum, and Troops G and B pushed forward again, slowly cutting their way through the heavy growth. An advance patrol of Troop G moved 700 yards southeast and found 5 unoccupied bunkers.
By the afternoon the troops had reached Old Rossum and were still moving slowly forward. At 1342 both units were pinned down by heavy sniper and mortar fire. When mortar fire was placed on enemy positions, Troop G was able to push ahead and by 1800 the entire squadron had pushed 200 yards south of Old Rossum on a 200-yard front. In the hard, slow advance the 1st Squadron had destroyed 21 bunkers and suffered a loss of 1 killed, 27 wounded.
110
Even though the squadron was now past the defenses at Old Rossum, it had taken 2 days to move less than 1,000 yards, and the gain had cost 68 casualties. It appeared that the same kind of fighting would have to continue, for ahead of the exhausted troops lay more bunkers, manned by Japanese ready to use their excellent positions to make our advance as costly as possible.
The sixth consecutive day of fighting along the Rossum Road began with a heavy artillery concentration, as well as rocket and mortar fire, although a requested air strike was cancelled. Another attempt was also made to find a possible route for flanking the enemy road positions south of Old Rossum, by a 14-man officer patrol sent out for this purpose. They were to follow the Lorengau River for about a mile and then to turn left. While the flanking possibility was being explored, the troops along the road pushed forward at 1142. Troop E, brought up from reserve, was to envelop enemy positions on his left flank, while Troops B, C, D, and G advanced on a 300-yard front with G and B astride the road as in the previous day's action.
In spite of the heavy artillery preparation, the attack on 24 March fared no better than on previous days. One difficulty was that the hundreds of 75-mm shells poured onto the positions did not have a sufficient penetrating effect to reach the entrenched bunkers through the heavy jungle growth. Even though delayed-action fuzes were used, reducing tree bursts to 10 percent, many of the bunkers remained untouched. As soon as the cavalrymen began their advance, Japanese came out of their holes, quickly set up their automatic weapons with supporting snipers, and poured fire upon our troops. With no visibility through the heavy forest, the troops advancing blindly under fire needed strong leadership to keep them moving forward. Troop B received the brunt of enemy fire and its commander, Capt. Roman D. Hubbell was killed.
A medium tank was employed to try to force the enemy position. However, the tank commander refused to move forward until preceding troops had probed for mines. This procedure drew enemy fire, which was extremely costly to the men near the tank. In addition, there were no means of communicating with the tank commander except through the pistol port. In the attempt to improve communications, the platoon leader accompanied the tank on foot until he was wounded by a mortar shell and had to be evacuated. The 7th Cavalry thought that the tank was more of a hindrance than a help.
111
At 1250, Troop E, moving around the west flank, was pinned down by heavy enemy mortar fire and the entire attack bogged down. The squadron had progressed about 250 yards south of the night's perimeter, and Lt. Col. John B. Maxwell, II, regimental executive officer, who had been placed in charge of the squadron on 23 March, reported to brigade headquarters that he would be unable to complete his mission without air support. Lt. Col. Kenneth L. Johnson, commanding officer of the 99th Field Artillery Battalion, also reported the disappointing results of his 75-mm howitzers.
The 1st Squadron had suffered 4 killed and 20 wounded and Colonel Maxwell believed he could no longer hold in his present location. He informed the brigade commander that he would have to withdraw to the previous night's perimeter, but the squadron held until after 1600, marking its forward lines with smoke pots to direct the requested air strike. Then the troops pulled back to their previous positions just south of Old Rossum. At 1730 strafing attacks were made and twelve 500-pound bombs dropped. In the late afternoon, the 105-mm guns of the 61st Field Artillery Battalion began registering on the Japanese bunkers and interdicted the road where the 1st Squadron had been stopped.
The 8th Cavalry Breaks the Enemy Hold
Attempting to overcome the enemy's delaying action along Number Two Road was assuming the proportions of a major action. The 1st Squadron, 7th Cavalry had suffered severe casualties in its repeated attacks, and the front line had been moved less than 2,000 yards from Lorengau in 6 days of fighting. Troop B had lost two troop commanders, and 87 percent of its officers were casualties. Fresh troops were needed for a renewed assault.
The main force of the remaining enemy defenders was well dug in on high ground. South of Old Rossum, this ridge was occupied by approximately a company, with tree snipers covering the track as well as all possible lines of approach to the bunkers. A wide flanking movement from the west seemed to be an impossibility, as the officer patrol that had been sent along the Lorengau River to find a route had been unable to make its way through the heavy jungle east of the river. The same line of advance, close to the road, would have to be followed as in the earlier attacks, but heavy artillery and air
112
preparation as well as tank and mortar support were expected to facilitate the cavalry advance.
The 1st Squadron, 8th Cavalry was ordered from Salesia Plantation to make the attack. In the early morning these troops would move by boat and buffalo to Lorengau. At 0800 the P-40's were to arrive and strafe all the road positions south of Old Rossum. The artillery would follow with a two-battalion concentration for a half hour. Under cover of this fire the 1st Squadron would leave the line of departure in box formation on either side of the road, with Troop A
113
leading the left column and Troop C the right. Troop B was to follow Troop C along the right side of the road and envelop the hill objective from that flank.
Promptly at 0800 the first flight of RAAF P-40's appeared over the target. Twelve planes, each flying two missions, dropped twenty-four 500-pound bombs and strafed the area with thousands of rounds of .50-caliber ammunition. As the last planes flew over, the artillery concentrations by the two supporting battalions came down and the 1st Squadron began its approach march, passing through 7th Cavalry troops some 500 yards behind their bivouac positions, from which they had withdrawn in order to clear for the air strike. The squadron's progress was slowed by the jungle growth and was further impeded by continuous sniper fire, even though the troops were well dispersed to protect against snipers. Dispersion made control over the troops difficult and the cavalry had to keep their pace regulated to the speed of the tanks, which inched along behind mine detector squads. As a result, the cavalry failed to cover the distance to the objective under cover of artillery preparation.
At 1335 the squadron was reaching the objective area, having knocked out two bunkers and four machine guns. Troop B discovered that a precipitous cliff and a swamp prevented an envelopment on the right of the hill, so it took up a position in support of Troop C, which was on the crest of the objective ridge by 1440, awaiting a counterattack. Troop A on the left waited on the forward slope of the objective ridge for tank and mortar support, as it was receiving mortar fire from the reverse slope. Troop A had suffered 24 casualties from knee mortars and from bunkers still intact.
One tank, damaged by a mine, was pulled out of the way by a bulldozer to allow the two others to go after the bunkers, plainly visible on the ridge, which were holding up Troop A's advance. A 105-mm howitzer concentration was placed on these positions and at about 1600 Troop A moved up the ridge, its right flank protected by Troop C upon the ridge. Fire from the twelve 81-mm mortars, commanded by Capt. Walter M. Hart, who established his OP well ahead of the combat elements, gave excellent support. Captain Hart adjusted his mortars so that 160 rounds of HE, heavy, with delay fuze was delivered on the exact crest of the hill into an area not larger than 50 by 100 yards. Under this cover, and using their own machine guns against the firing slits, the troops advanced within grenade-
114
throwing range. Both the medium and light tanks made their way around the disabled tank and directed their machine guns and larger weapons against Troop A's objective.
When the foot troops were on top of the positions, the tanks, assisted by flame throwers, went forward to finish off the bunkers. Bulldozers followed them up by filling in all bunkers, trenches, and fox holes. Japanese trying to escape were cut down by rifle fire, and no attempt was made to explore the interior of bunkers as it was felt that investigating troops would be endangered.
By 1700 all enemy resistance had ceased. The 1st Squadron dug in on top of the ridge, which gave excellent observation over the road to the south. There was no sign of further enemy positions to the front. The day's successful action had cost the 8th Cavalry 7 killed and 29 wounded, but almost 100 of the enemy had been destroyed. The last concentrated resistance on the Rossum Road was broken.
The difficulties of destroying an enemy force well entrenched in jungle terrain had been fully demonstrated on the Rossum Road. The 1st Cavalry had gained valuable experience, particularly in the methods for using supporting weapons and air coordination. The last successful fight had involved maximum use of supporting fires to aid the infantry, and the results had brought out both limitations and advantages. The air strikes, artillery, bazookas, flame throwers, and tanks did not succeed in wiping out the enemy positions to the extent desired; nevertheless, the combined employment of these weapons helped the riflemen, covered by the BAR man and closely supported by mortar fire, to get close to the remaining bunkers and finish off the stunned occupants.
P-40's, used as bombers, had not proved as accurate as B-25's. An improvised bombing method forced them to commit themselves to their bombing run while some distance from the target. Although cavalry lines had been withdrawn 500 yards preceding the air strikes on the last enemy positions south of Old Rossum, the bombs were so dispersed that some fell in close proximity to the bomb line. The artillery was little better in putting the bunkers out of commission. After 1,455 rounds of 105-mm artillery fire had been poured on the same positions, an observer could obtain evidence of only 2 bunkers destroyed by it. Nevertheless, the artillery seemed to have accomplished two of its missions. It prevented the enemy from reentering the bombed area and pinned him to his fortifications.
115
Bazookas were not very effective against bunkers. The training allowance of bazooka rockets had been limited, so the effectiveness of the weapon's use depended on the operator's individual aptitude. Since most of the bunkers attacked were old and covered with vegetation, the slits were difficult to locate. When the slits could be seen from a distance of 25 yards, bazooka operators could place a rocket through the slit or right beside it. If the rocket went through the slit it would kill all occupants; if right beside it, the enemy would be stunned and a grenade could be put through the slit. The movement of tanks was limited and, according to the observer, Col. Marion Carson, they were not used in the assault until the troops had advanced slightly beyond the enemy position.
The terrain offered no suitable positions for artillery observation posts, so the forward observers had control both of the initial concentration and the fires on enemy positions. Artillery communication was by radio, but sound-powered telephones were generally used between the cavalry commands. Although radio was available, the sound-powered telephone was more reliable and the enemy could not listen in. Conversations could be carried on in a lower voice, and there was no antenna to get tangled in vegetation or betray locations by moving shrubbery.
The fight on 25 March represented the last large, coordinated action on Manus. Only remnants of the enemy remained, to be dealt with by units of troop size or less. The Rossum Road action had proved that jungle fighting, even against a numerically inferior and disorganized enemy, could be more difficult and dangerous than fighting larger numbers in open country. Both regiments together had lost a total of 36 killed and 128 wounded in the week of fighting to break the block on Rossum Road. Because bunkers were destroyed without searching and the jungle made an exact count impossible, the number of Japanese killed could not be determined, but probably no more than 200 Japanese had held up our units of squadron size. If the small groups of Japanese left on the island decided to give as determined resistance in well-chosen jungle positions, they could perhaps exact the same expensive ratio of casualties from our large and victorious force. Mopping up Japanese in the jungle was not an operation to be taken lightly, but was a necessary final measure, if the projected naval and air installations were to be safe from snipers and small group raids.
116
page created 28 June 2001